ImageExport Overview
ImageExport is a simple, flexible way to export images from PowerPoint slides.
The ImageExport Toolbar

| Button | Name | What it does |
 |
Preferences | Set your export preferences (image size, naming, etc.) |
 |
Export images | Exports images at current settings |
 |
Help | Get help with ImageExport or register it after you purchase it |
| Icon | Name | From PPT menu bar |
 |
Preferences | PPTools, ImageExport, Preferences |
This is where you do all the setup needed for ImageExport.
ImageExport records your settings for each presentation in the presentation itself and recalls them the next time you re-visit the dialog box with the same presentation open.
If you've never exported images from a presentation, ImageExport defaults to the settings you used for the previously exported presentation.
The ImageExport Preferences dialog box is divided into several sections. Here's what each of them does:
Export as
This is where you choose the file format for your exported images. Click JPG, GIF, BMP, PNG, TIF, EMF or WMF, whichever is most appropriate for your uses.
If you use PowerPoint 2002 or earlier, you may notice that PowerPoint randomly exports corrupted TIF files. This is due to a bug in PowerPoint itself; we have no control over it. If you run into problems with exported TIF images, we recommend that you export as PNG instead, then convert to TIF using IrfanView (free!) or Photoshop or a similar program that can do batch conversions.
Export range
Click "Entire presentation" to export all of the slides in your presentation to sequentially numbered files.
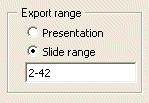
Or if you only want to export certain slides, click "Slide range". The Export range area changes to this:

In the "Slide range" text box, you can type the numbers or ranges of slides that you want to export, separated by commas, just as you can in PowerPoint's print dialog box.
Examples:
- 1,3,5,7,9
Slides 1, 3, 5, 7 and 9 - 1-9
Slides 1 through 9 inclusive - 1-9,15,20-42
Slides 1 through 9, slide 15 and slides 20 through 42
Browse, Save to folder, Base name, Number format
ImageExport exports images to any folder you like. Select the folder here (click Browse and navigate to the folder you want, or type in the name of the folder).
If the folder name you type doesn't exist, ImageExport offers to create it for you when you click OK.
If you don't supply a folder name (ie, leave this box blank), ImageExport creates a new folder for your images. It'll name it after the presentation you're exporting and create it in the same folder as the presentation.
In other words, if you're exporting images from c:\myfiles\mypresentation.ppt, it'll create c:\myfiles\mypresentation\" and export all of the images to that folder.
ImageExport exports images as a series of files, each with a "base name" followed by a sequential number. This is where you set the base name. For example, if you want your exported slides to be named MySlide0001.PNG, MySlide0002.PNG and so on, type "MySlide" into the "Base name" text box.
If you leave "Base name" blank, ImageExport uses "Slide-" as the base name.
Number format lets you create customized numbering formats for your exported images. The default is "0000", which causes ImageExport to format all slide numbers with four digits, including leading zeros if needed. If you only want two digit numbers, you can use "00" instead, for example.
Notice that as you change the output folder, base name and number format, you'll see a "live" preview below in the "Your image file names will look like this:" area. It shows you what an example slide 42 will be named, where it'll be stored and what size it'll be.
I want to specify image size ...
You can specify the size for your exported images in two ways:
- Click Pixels and enter the image width in pixels you want. ImageExport calculates the image height automatically (the resulting image is always proportional to your slide size, never distorted).
- Click DPI to set the size in DPI. ImageExport exports your images at the DPI value you supply times the current width and height of your slides. It shows you the resulting width and height in the Pixels area.
Note: when you export WMF or EMF files, the image size options become disabled. WMF and EMF files are "vector" graphics; they're resolution-independent and don't have a specific size in pixels, so these settings have no meaning.
| Icon | Name | From PPT menu bar |
 |
Export images | PPTools, ImageExport, Export images |
Click this button to export image files from your slides, according to the preferences you set above.
| Icon | Name | From PPT menu bar |
 |
Help | PPTools, ImageExport, Help |
Get help with ImageExport, access the PPTools and PPT FAQ web site, register your copy of ImageExport once you've purchased it, etc. Click the button to see this dialog box:


