Fly it! PPT2HTML (the basics)
Set it up
Before you use PPT2HTML, you'll want to customize it to suit your needs. You do this using its Preferences dialog box. To access PPT2HTML preferences, open a PowerPoint presenation you'd like to convert to HTML then click the Preferences icon on the PPT2HTML toolbar. It looks like this:
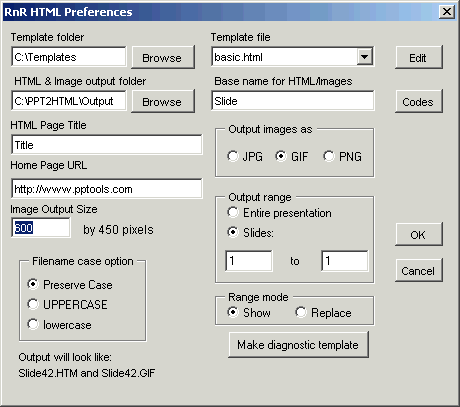
Or from the main menu, choose PPTools, PPT2HTML, Preferences. Either way, you'll see this dialog box:

There's detailed information about each option in the PPT2HTML Setup section of the User Manual, but for now, here's how you can give PPT2HTML a trial run:
- Template file
Choose "basic.htm" - HTML & Image output folder
Click Browse and choose the folder where you want PPT2HTML to put the HTML files and images it creates - Base name for HTML/Images
All HTML and image files will get a name like "Abc001.htm" and "Abc001.gif". In this case, "Abc" is the base name. PPT2HTML will add a number and extension to the base name you supply here. - HTML Page Title
Type the name of your presentation here - Home page URL
Leave this blank for now or type in your web site's home page URL - Output images as
Click PNG - Output range
Click "Entire presentation" - Image output size
Type 800 - Other options
Leave as is
Click OK and when PPT2HTML offers to convert your presentation to HTML, let it.
It will show you a summary of the options you've chosen and when you accept them, it'll convert your presentation. It shows you each slide while converting it so you can judge progress.
When conversion is complete, PPT2HTML will open the converted HTML in your browser for you.

