Prep4PDF - Features in detail
Here's a detailed look at all of the Prep4PDF toobar and menu items (each toolbar has a corresponding menu item; you can use either to work with Prep4PDF
If you use Adobe Acrobat or some other product that includes a printer driver that automatically creates PDF for you when you print, you won't need to use most of these features. Normally, you'll use the Preferences dialog box to set some Prep4PDF options then click AutoPDF whenever you want to create a PDF from a PowerPoint presentation.
You may occasionally want to use the Help button to learn more about Prep4PDF, check for updates, register your software, etc.
The other buttons on the Prep4PDF toolbar are useful if you use PDF-making software that requires you to create a PostScript file then manually "distill" that into PDF using other software. Prep4PDF fully supports both manual and automatic methods. Supported Printer Drivers
The Prep4PDF Toolbar

| Button | Name | What it does |
 |
Preferences | Opens the Prep4PDF Preferences dialog box where you can set a variety of options that affect the appearance and interactivity of the PDFs you make with Prep4PDF. |
 |
AutoPDF (Prep and Print to PDF) | Automatically preps and prints your PDF to the printer selected in the Preferences dialog box. Has the same effect as if you click Prep4PDF, then print, then click Remove Changes, but performs all three steps automatically for you. This is the preferred way to use Prep4PDF if your printer driver and PDF making software support it. |
 |
Prep for PDF | Gets your presentation ready for printing to PDF but doesn't actually print anything. Useful if you need to print to a PostScript file then manually convert it to PDF using other software. |
 |
Remove changes made by Prep4PDF | Deletes the EPS graphics that Prep4PDF creates. In effect, this is the "Undo" button that reverses changes made by Prep4PDF. AutoPDF automatically does this for you. |
 |
Show/Hide Prep Images | Displays or hides the EPS images that Prep4PDF adds. Normally you won't need to use this. |
 |
Show Prep4PDF Help | Displays help information about Prep4PDF. |
| Icon | Name | From PPT menu bar |
 |
Preferences | PPTools, Prep4PDF, Preferences |
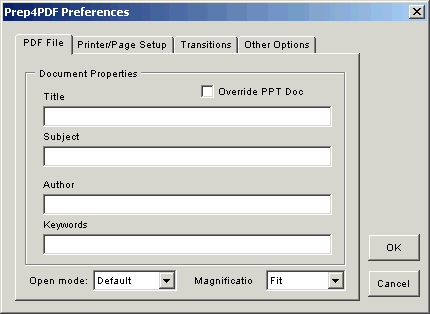
When you click Preferences, the Prep4PDF Preferences dialog box appears. The dialog box has four tabs, each with various related options on it. Here's what's on each of the tabs:
PDF File tab

Document Properties
PDF files, like PowerPoint files, can have several Document Properties that convey information about the subject matter of the document, its author, keywords for searching and so on.
By default Prep4PDF sets the PDF's properties to match the equivalent properties in your PPT file but you can substitute your own property values instead by entering them here.
If you put a checkmark next to "Override PPT Doc", Prep4PDF always uses the properties you enter here.
If you remove the checkmark, Prep4PDF uses the PPT file's properties if they're there, or the properties from this dialog box if not.
Open mode and Magnification
Open mode: PDFs can open in any of several possible states: Fullscreen, Page with Thumbnails, Page with Bookmarks, Page only or Default, meaning whatever the user has chosen as their preference in Reader. Here, you can set the way you want your PDFs to open.
Magnification: Acrobat can display PDFs at several zoom levels or zoomed so that the page or the page's visible contents fit the PDF window. Choose the magnification you want here.
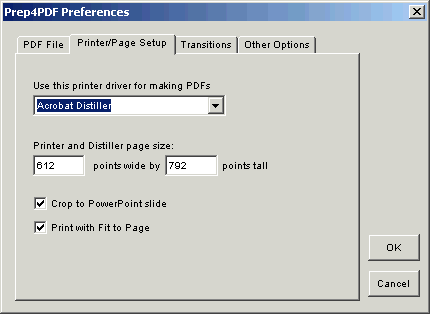
Printer/Page Setup tab

Use this printer driver for making PDFs
This list box gives you a list of the printer drivers installed on your computer. Choose the one you want to use for making PDFs. Usually you'll pick "Adobe PDF", "Acrobat Distiller", "Jaws PDF Creator" or some similar driver supplied with your PDF-making software.
It's up to you to pick an appropriate driver. Prep4PDF warns you if you choose a driver it knows to be incompatible.
See Supported Printer Drivers for more information about printer drivers.
If you don't have a driver that makes PDFs directly, you'll need to create a PostScript file that you can convert to PDF using some other program like GhostScript. We'll describe this process later. The following instructions assume you can print directly to PDF. See Compatible PDF-making software for a list of known-compatible programs and drivers.
Printer and Distiller page size
This is where you tell Prep4PDF about the default page size Distiller or other PDFmaking software will use. The setting here should match the page size setting in Distiller, in points.
Crop to PowerPoint slide
Instructs Distiller to crop the final PDF pages to the PowerPoint page size if checked.
You'll usually want to leave this checked. Since some versions of Distiller ignore cropping instructions, you may still need to adjust the page cropping after the PDF is made.
Print with Fit To Page
Instructs Prep4PDF to use PowerPoint's Fit To Page printer setting when making the PDF. Leave this checked as a rule.
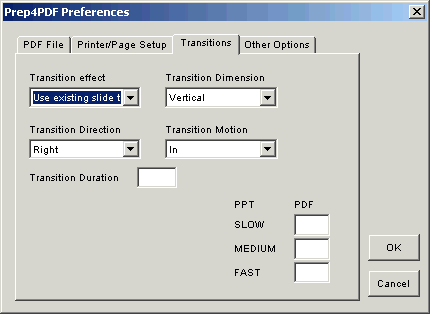
Transitions tab

Prep4PDF can translate PowerPoint slide transitions to the closest equivalent page transition supported in PDF. Some are fairly close, some are not; PDF offers a much more limited selection of transitions than PowerPoint does. If you prefer, Prep4PDF can use a single transition for all pages in the PDF.
Transition effect
If you choose "Use existing slide transition" Prep4PDF translates PPT transitions to PDF transitions automatically.
Prep4PDF ignores the Dimension, Direction, Motion and Duration settings in this dialog box. Instead, it picks up the equivalent information from the PowerPoint slide transition settings.
Choose one of the other options to force all transitions to be the same. You can then choose Dimension, Direction, Motion and Duration settings to modify the basic transition you've chosen.
PPT vs PDF Transition Speeds
PowerPoint lets you set slow, medium or fast transition speeds. In PDF, transition speeds are set in seconds. Here you can supply the number of seconds to use (in the PDF transition) for each of the PowerPoint transition speeds.
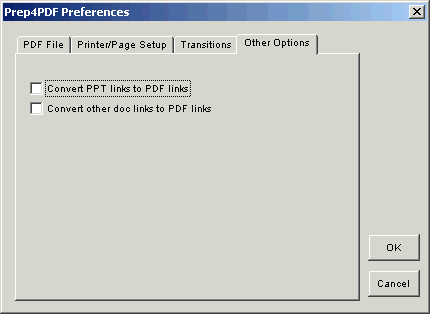
Other Options tab

Convert PPT links to PDF links
Suppose you have a collection of linked PPT files that you want to convert to a collection of linked PDFs. Ordinarily, you'd have to change all the PPT links to PDF links throughout your PPT, and then convert it to PDF.
And first, you'd have to convert all of the linked PPTs to PDF so that you could link to them.
Instead, put a checkmark next to Convert PPT links to PDF links and Prep4PDF will convert every PPT link to a PDF link instead.
For example, suppose you have a PPT file called MainPres.ppt with links to various pages in SubPres.ppt
If you use this option and make MainPres.PDF using Prep4PDF, the links will now point to SubPres.PDF -- a PDF of the same name as the original target PPT. All you need to do is make a PDF from each of the PPTs and make sure it has the same name as the original PPT. Your links stay put and keep working in the PDF.
This option affects only links to other PowerPoint files. If you want to take it a step further, read on:
Convert other doc links to PDF links
Same as above, but affects links to documents other than PPTs. For example, if you have links to various other documents (spreadsheets, Word files, etc.) and use this option:
A link to MyWord.DOC becomes a link to MyFile.PDF in the finished PDF
A link to MySheet.XLS becomes a link to MySheet.PDF in the finished PDF
In short, Prep4PDF removes the original extension from the link and substitutes ".PDF" instead.
Watch Out! - MyFile.DOC and MyFile.XLS and MyFile.ETC all become links to MyFile.PDF in this case. You can't have three different PDFs with the same name.
| Icon | Name | From PPT menu bar |
 |
AutoPDF (Prep and Print to PDF) | PPTools, Prep4PDF, AutoPDF (Prep and Print to PDF) |
When you click AutoPDF (Prep and Print to PDF), Prep4PDF automatically:
- Prepares your presentation for printing to PDF
- Prints the presentation to the printer driver you chose in Preferences
- Removes any changes it made to the presentation in the process of preparing it for PDF
This is functionally equivalent to clicking Prep for PDF, printing to a suitable PDF printer, then clicking Remove changes made by Prep4PDF
For most users, AutoPDF (Prep and Print to PDF) and Preferences are the only parts of Prep4PDF you'll need.
| Icon | Name | From PPT menu bar |
 |
Prep for PDF | PPTools, Prep4PDF, Prep for PDF |
When you click Prep for PDF, Prep4PDF prepares your presentation for printing to PDF but doesn't actually print anything. It analyzes your presentation and adds the special EPS files that instruct a suitable PDF printer to create links, bookmarks, etc.
| Icon | Name | From PPT menu bar |
 |
Remove changes made by Prep4PDF | PPTools, Prep4PDF, Remove changes made by Prep4PDF |
Remove changes made by Prep4PDF removes the special EPS files that Prep for PDF adds. Think of it as an "undo" button for Prep for PDF
If you use AutoPDF (Prep and Print to PDF) to prepare and print your PDFs, you don't need to use Remove changes made by Prep4PDF afterwards. AutoPDF (Prep and Print to PDF) does this automatically for you.
| Icon | Name | From PPT menu bar |
 |
Show/Hide Prep Images | PPTools, Prep4PDF, Show/Hide Prep Images |
In most cases you won't see the special EPS graphics that Prep for PDF adds to your presentation but in some cases they can't be hidden.
If you need to use your presentation as a screen show or to print to a normal printer after using Prep for PDF, you can click Show/Hide Prep Images to hide all of the EPS files, then click it again later to unhide them. Normally, Prep for PDF and Remove changes made by Prep4PDF work so quickly, we recommend using Remove changes made by Prep4PDF to remove the EPS as needed, then re-add them later with Prep for PDF.
| Icon | Name | From PPT menu bar |
 |
Show Prep4PDF Help | PPTools, Prep4PDF, Show Prep4PDF Help |
Show Prep4PDF Help brings up useful help information about Prep4PDF. On the same screen there are buttons that link you to more detailed help, our PPTools web site, the PowerPoint FAQ site and more.
[Previous] [Home] [Next]
